& hack your way to better riding even when you can make it to the barn
You might be wondering what a wobble board is and why the heck I’m talking about them on a blog about horses!?! Well, what if I told you a wobble board or balance board could make you a better rider even when you don’t have time to go to the barn.
Some equestrian wobble board benefits include...
Overall better balance.
Stellar core strength.
More flexibility in your lower back.
Increased awareness in your seat.
Ankles that are way more flexible (heels down – no problem).
Improve independent muscle movement.
There’s more but this list is getting a little lengthy so I’ll stop there before I start to sound like a used car salesman.
I’ve put together a whole post here with exercises that you can do on a wobble board tap into the benefits listed above. You can check it out right here => Wobble board exercises to 10X your riding. You can buy wobble boards if you don’t want to have to make one but they are super easy to whip up and the supplies are only about $10.
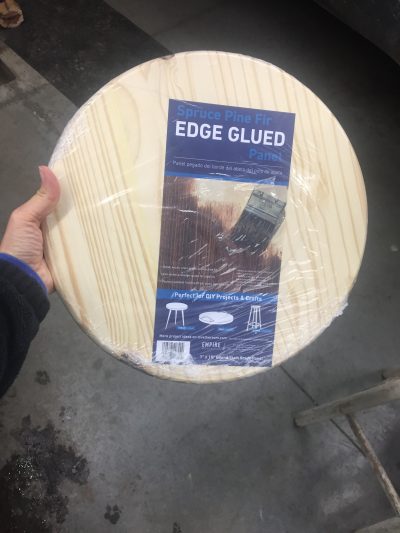
Supplies required
1- 15″ round pine board panel
1- Small round bun foot – like the kind they put on the bottom of furniture. You can find both these items at most building supply stores. I picked em up at Lowes in the wood trim department for just over ten dollars.
A dab of glue – I used Gorilla Glue cause it’s super strong and dries faster than wood glue.
A drill with a drill bit that is a tick smaller than the bolt that comes in the bun foot.
A ruler or tape measure and pencil
100 grit sandpaper
1 roll of vet wrap
Step One - Find the center of your round board.
I used a ruler to measure across the diameter of the round panel making a line in the center. Then measure and mark across the diameter the opposite way. Your center point should be where the two lines intersect. To double-check just measure from the edge to the center in a couple of places on the circle to make sure they come out to the same length.
Step Two - Drill a hole in the center of the round board.
Now that you’ve found the center of the board drill a small hole in it so that you can screw the bun foot bolt into it.
Step Three - Sand the edge of the bun foot.
You’ll want to sand the flat edge of the bun foot just enough to smooth it off. Rounding it off to help it wobble easier after it’s attached to the board.
Step Four - Add Glue and assemble.
Add a dab of glue to the wood around the bolt (not too much or you’ll have an oozing issue later). Then screw the foot onto the round board as tightly as you can by hand and let it dry.
Step Five - Add Grip.
You can make your board grippy so it’s easier to use by wrapping a couple of strips of vet wrap around it.
I can help you do just that.
Join thousands of other Insightful Equestrians getting a weekly roundup of my best problem solving tips + a bit of inspiration to keep you and your horse feeling and riding your best.


